Removal of the stock Toyota Brake LSPV
(a.k.a. Proportioning Valve)
In trying to work out the brakes on my 4Runner build-up, it came time to address the stock load sensing proportioning valve (LSPV). In stock form, the LSPV is a valve that attaches an arm to the rear axle, so that a heavily loaded bed compressed the suspension, which applies more braking power to the rear brakes. Over time however, many people find that off road, the stock Toyota system doesn't put enough pressure to the rear, and end up tying the end of the arm up under the bed to get maximum braking power to the rear. I ran my brakes this way for years on my 1990 Toy and was very happy with the added rear braking power.
With the swap to Dana 60's under my 4Runner, using 3/4 ton Dana 44 calipers on all 4 corners, I had to overhaul my entire braking system. A part of that was removing the stock LSPV from the system.
I sat down and starting considering the easiest way to go about this. What I came up with only requires a couple of small parts from a junkyard (or your own parts vehicle collection), a grinder, a welder, and about 30 minutes... No joke.
Let me say that I am NOT recommending you make this modification to your stock brake system. Not only might it be illegal where you live, but you need to fully understand how your braking system works, and this modification should only be made as a calculated part of creating a better braking SYSTEM. Your life may depend on your brakes - so make sure you know what you are getting in to.
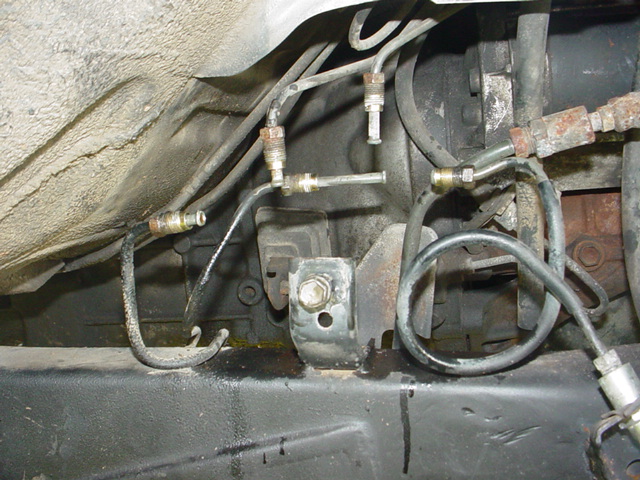
In the passenger side fender well, bolted to the frame, is a junction bracket assembly that has 2 junctions on it. When looking at it from the passenger side of the vehicle, the one on the left is an "L" junction that has a line coming down from the master cylinder, and a line going back to the rear brakes. The right one is a "T" junction with a line down from the master cylinder, one line feeding the passenger side caliper, and another line that comes from the LSPV in the rear of the vehicle.
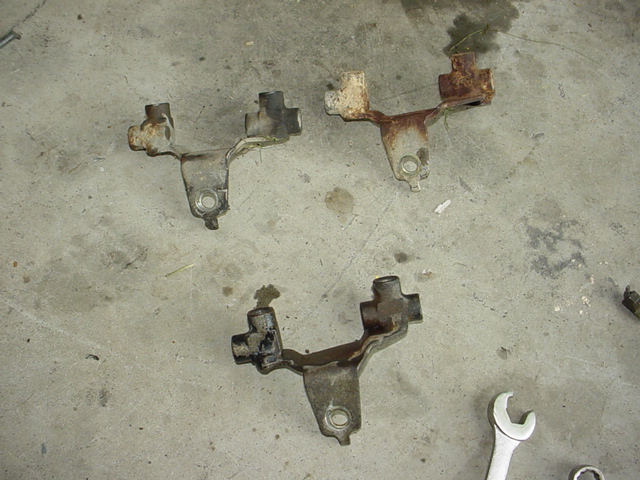
In addition to the stock junction already on your truck, you will need 1 more, or possibly 2 - depending on your particular setup (more on that later). I happened to have 2 parts vehicles at the house so mine were free, but these are small parts that should be pretty cheap even from a commercial junkyard source.
Here you can see where I have removed the junction from my 4Runner, leaving just the lines in place.
What you will want to do is use a grinder to remove the "T" junction from your stock bracket, as well as using a grinder to remove the "L" junction from one of your donor brackets.


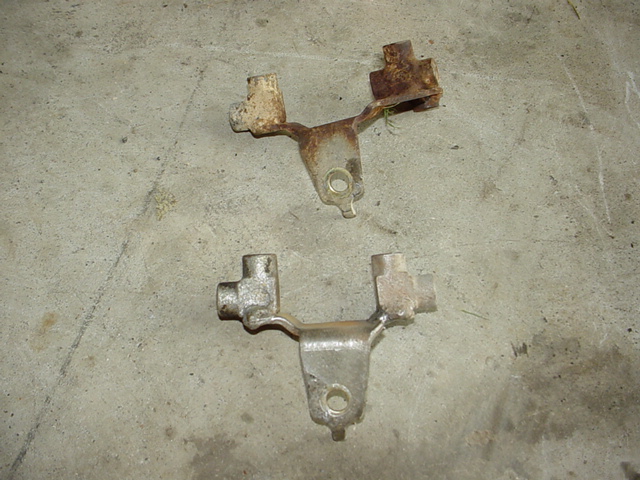
What you are trying to create is a bracket with two "L" junctions on it. Simple weld the "L" junction in place of where the "T" junction was on your stock bracket. In this picture, you can see a stock bracket on top, and my modified bracket on the bottom.
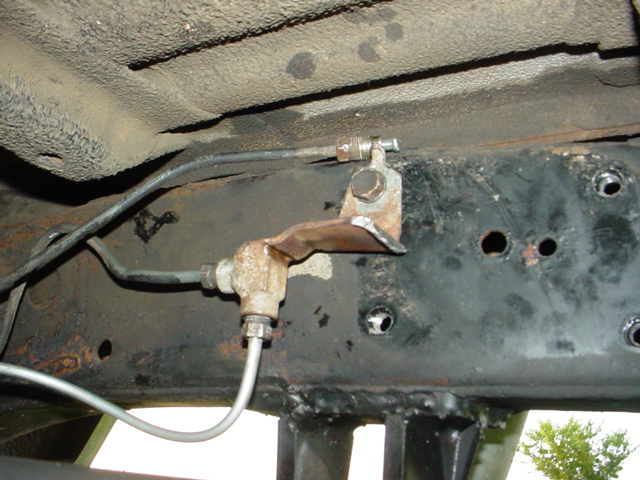
Then all you have to do is re-install the modified bracket back on to your vehicle. You can see the unused line from the LSPV directly behind the bracket. I know the unused line is tough to spot, to reference the previous picture and it should clear up and confusion.

Now it is time to move to the rear and deal
with the LSPV itself. Remove all of the brake lines, then the 4 bolts that
hold the valve to the frame. Disconnect the arm end from the axle (or
wherever you may have it attached) and toss it away.
If you still have the stock metric rubber line in place for the rear axle, this part can be super simple. You can just bend the line from the master cylinder down and attach it directly to the rubber line.
On my vehicle, The swap to a Dana 60 rear axle meant I no longer had the stock metric rubber line in place, so I used a second donor bracket. Using the grinder again, this time remove the "T" junction from the bracket, leaving the "L" junction attached. Now take this half of the bracket and attach it to one of the mounting bolt locations that the LSPV was attached to the frame with. Figure out which line is attached to the master cylinder (remember, one line is now disconnected from the system) and attach it to the "L" and attach the hard line that feeds the rear brakes as well.
I left the extra line in place, but you could cut it back to get the ends out of the way, or remove it entirely from the vehicle (a pain, IMHO). Just check for leaks, and bleed the brakes - you are done.
| This page last modified 07/10/03 |
Questions? Concerns? email DRM |