Swaybar Disconnects

swaylinks.jpg (21169 bytes)     

More pictures below...      

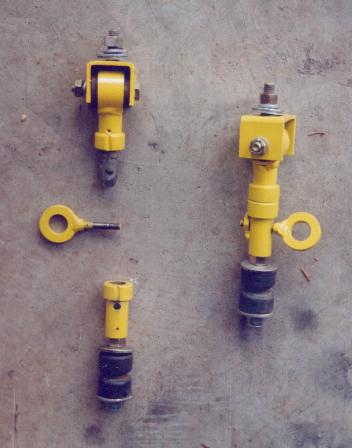
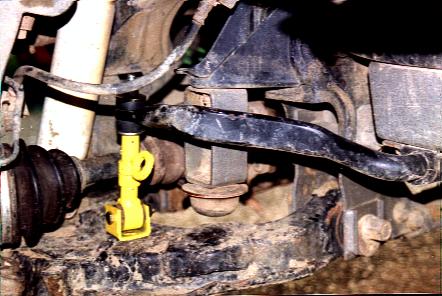
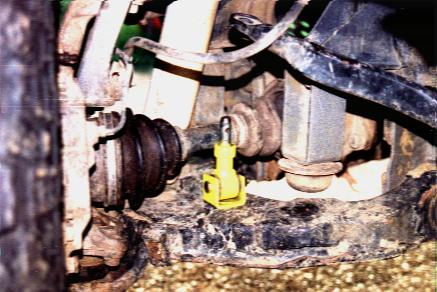
    These are the sway bar disconnects that I came up with and a friend built for me.  We deisgned these disconnects for my 1990 Toyota 4x4 truck, but the basic design could be applied to make disconnects for a variety of vehicles.  (For example, you could have eye type mounts on both ends, or studs on both ends)

    If you have an 86-95 IFS Toyota, you know by now that the sway bar on the front of these vehicles really limit the front suspension.  There are several options to remedy this problem, including buying some pre made disconnects, building your own, or removing the sway bar all together.  I ran these disconnects for almost a year until I decided to remove the sway bar completely.   For my truck, driving without a sway bar offers no reduction in road handling.   Below is a basic description of how to make some sway bar disconnects like the ones I had.   If you are not up to that, you may want to look at purchasing a set from Drew Persson.  In the end, you may end up like me with the sway bar just taking up space in the garage.

    This is a revised copy of the original description I wrote and posted to the Toyota 4x4 mailing list.  I have added few comments to bring the text up to date.   

    A friend of mine, Trevor Williams went ahead and made some sway bar disconnects before I could give him the drawings I made.  No problem, we talked and the lengths matched perfect.

    I have several things to say about these.  First, these are very heavy duty. These things make some other mass produced disconnects look wimpy as far as I am concerned. Another thing I like is the fact that he made them so that if they broke (believe me, not very likely) parts can be removed and replaced.   I will try to describe them to the best I can.
    The upper portion remains a stud type as the original links had. This is a piece of all thread. The body is made of two large case hardened allen head bolts (industrial type) that the threads have been turned off of on a lathe.  You may find it easier to find another way to do this.  The top one was drilled and tapped to accept the all thread. the other end of that same piece was also drilled to be the female end of the disconnect.
    The lower turned bolt was drilled and tapped to accept the male stud. This piece is a bolt with thread and non-threaded area near the head. It was screwed into the lower turned bolt, then the head was cut off and a bevel was put on. The other end of the turned bolt was welded to a 1" i.d. piece of tubing. All joints are drilled and secured with rolled pins to secure them but allow removal.  A hole was drilled through to accept a pin. a nut was welded on one side, and a threaded bolt is used in place of a pin. I large washer was welded to the head of the pin-bolt to simplify removal.   This sometimes was difficult to remove, so possibly another pin design would be better.
    The upper stud re-used the stock type bushings and washers. The lower mount was changed to an eye. This was done by cutting a rectangular tube in half and drilling holes in the sides and bottom. The bottom uses a bolt that has had the head cut off, and welded to the lower eye mount (cut rectangular tubing). This was bolted in where the lower mount was. A bolt was run through the lower mount and the eye of the disconnect link.  There was some problem with the nut holding the lower eye mount to the lower A arm coming loose.  Use of loctite here would solve this problem.
    The change to a lower eye mount was necessary to make reinstallation line-up a little easier. The stock lower eye bushings were re-used and ground down some to
reduce their diameter and allow both to be pressed into the eye. The use of a lower eye mount also allows the lower portion of the disconnect to "lay down", eliminating any binding or similar problems.
    There is some problem with re-attachment. The truck must be level to allow
both pins to be installed. Not a serious problem, but a problem.  From what I have heard, this is a universal disconnect problem, and the use of a little leverage on the sway bar will usually line things up pretty easily.
    I used poly bushings at the frame mounts, and the sway bar does not need to be tied up. Even with off road use, the sway bar does not move around when disconnected. The poly seemed to hold the bar solidly in place.

I did not give any length measurements here because it may vary from truck to truck depending on lift height and other factors.  If you have any more questions, or if you use any of this to build a set for yourself, let me know.

swaylinks2.jpg (34801 bytes)  swaylinks3.jpg (33491 bytes)


This page last modified 07/10/03

Main Page

Questions? Concerns? email DRM